This panel allows a user to jog the robot under manual control. A dynamic display is available that shows the current position of the robot in both world coordinates and joint coordinates. Controls are provided to enable power, disable power and home the robot. This control panel is available to individuals with all levels of access.
| Virtual Pendant Control Panel Overview | |||||||||||
|---|---|---|---|---|---|---|---|---|---|---|---|
|
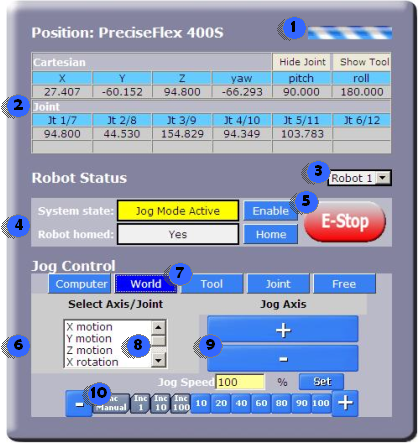
1. Connection Indicator |
This provides a visual indication of when the browser is connected to the controller. This indicator will spin when communication is active and will freeze when communication is momentarily lost. |
||||||||||
|
2. Current Position |
This panel displays both the Cartesian and Joint position for the selected robot. Only configured joints are displayed (up to 12). |
||||||||||
|
3. Robot Selection |
Allows the user to select the robot to be controlled by the virtual pendant. The "Current Position" displays the information for the selected robot. |
||||||||||
|
4. Robot Status |
This panel allows a user to perform basic robot operations. The "System state" indicates the robot's motor power state and execution status. The "Robot home" indicates if the robot has been homed. |
||||||||||
|
5. Enable / E-Stop /Home |
The Enable/E-Stop buttons manually enable and disable power to the motors. The home button will initiate the robot homing sequence. Homing is required when the system is powered up to establish the zero reference for each axis. Please note, the E-Stop button is a convenience feature and is not intended as a replacement for a hardwired safety E-stop button. |
||||||||||
|
6. Jog Control |
This panel allows the user to manually move a selected axis in different modes. Robot power must be enabled to use this feature. |
||||||||||
|
7. Jog Mode |
There are 5 different modes to select from:
|
||||||||||
|
8. Select Axis/Joint |
This list specifies the axis or direction of motion and dynamically changes based on the Jog Mode. In World/Tool modes, the user can pick world 'X,Y,Z,Theta'. In Joint/Free mode the user can pick individual joint axis (1-12) based on the configuration of the arm. |
||||||||||
|
9. Jog Axis |
These two buttons will jog the selected axis in the selected mode in a positive or negative direction. By holding down on the button, the robot will continue to move in the given direction. These buttons are disabled when the robot is in 'Computer' mode or if communication is lost to the controller for too long a period of time. |
||||||||||
|
10. Adjust Speed |
The user can adjust the overall jog speed by selecting one of the pre-defined number buttons, entering a value directly, or clicking on the the [+] and [-] buttons. |
||||||||||