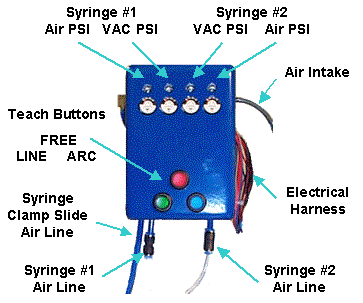
The Dual Control Air Dispenser drives the air lines for the two syringes and the pneumatic actuator for the sliding syringe clamp. In addition, this device has back-lit buttons that greatly simplify teaching path "nodes" and that display the system execution state when a path is being executed. Figure 43-2 illustrates the key elements of this device.

Figure 43-2: Dual Control Air Dispense
For each syringe, this device provides two pressure regulators: one to control the positive pressure that forces the syringe plunger to dispense fluid, and a second regulator that supplies air to a venturi device that creates a vacuum in the syringe air line when the positive pressure is turned off. The vacuum assists in backing off the syringe plunger to minimize dribbling of the dispensed fluid.
Each of these regulators can be adjusted from 7 PSI up to 100 PSI. An adjustment screw is available through a hole that is above each of the miniature pressure regulator meters.
NOTE: To avoid accidental changes in the pressure settings, the air pressure screw adjustments normally have a locking nut engaged. To release the lock nut, remove the cover of the air dispenser and loosen the nut.
NOTE: The positive pressure for each syringe should be adjusted to provide the desired flow rate of dispensed material. If the pressure is too high, the fluid will be too thick. If the pressure is too low, a continuous bead will have unexpected breaks in the bead.
The three-backlit buttons on this unit provide a very convenient means for teaching a path. When the top button is clicked, the robot is "freed" to permit it to be manually moved to any desired position. For robots like the PrecisePlace that have direct drive motors on the X & Y axes and very little friction, it is quick and easy to manually push the robot and accurately position the syringe tip in free mode. When the robot has been properly positioned, clicking one of the two lower buttons records either a node on a straight line or arc path. These three buttons provide a very intuitive and rapid means for training even complex paths.
Table 43-1 describes the use of the buttons and the interpretation of the button lights during both path teaching and normal execution.
| Backlit Button | During Teaching | During Process Execution | |
|---|---|---|---|
|
Red (Free) |
|
Click to "Free" or "UnFree" all axes of the robot. Backlight is on when in Free mode. |
In dispense simulation mode, backlight is on when fluid should be dispensing. |
|
Green (Line) |
|
Click to create and teach a Line node. Backlight blinks momentarily to indicate node created. |
Backlight is on when a Line node being executed. |
|
Blue (Arc) |
|
Click to create and teach an Arc node. Backlight blinks momentarily to indicate node created. |
Backlight is on when an Arc node being executed. |
|
Blue & Green |
|
N/A |
Both backlights are on when executing a Dot or Pause node. |