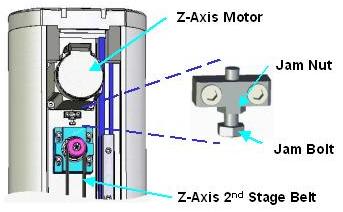
Replacing the Z-Axis Motor Assembly

The Z-Axis Motor Assembly consists of the Z-axis motor, a drive pulley mounted on the motor shaft together with belt retaining flanges.  This motor assembly can be replaced while the robot is mounted in the standard vertical orientation.


               Electrical Shock Hazard

Contact with electrical power can cause serious personal injury or death. All of the motors for the PreciseFlex robot are operated at between 160 VDC and 320 VDC. As such, the motor wires present a high-risk.

  • Do not touch unshielded pins and conductors unless the main AC power to the robot is first disconnected.
 

To replace this assembly, perform the following operations:

Step Action

1.  

Lower the Z-axis to the bottom of its travel.

2.  

Disconnect the main AC power to the robot.

3.  

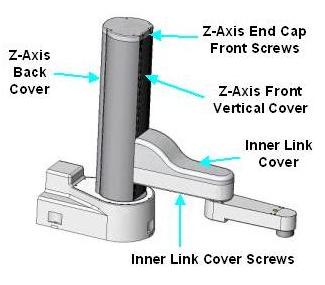
Remove the Z-Axis Back Cover to access the 1st Stage Belt.

4.  

Remove the Inner Link Cover by removing 6 screws on the bottom edge of the Inner Link.

5.  

Remove the front two screws of the Z-Axis End Cap.  The End Cap does not have be detached from the Z-axis.

6.  

Remove the Z-axis Front Vertical Cover by carefully sliding it clear of the Z-Axis End Cap and off its registration pins at the base of the Z-Axis.

7.  

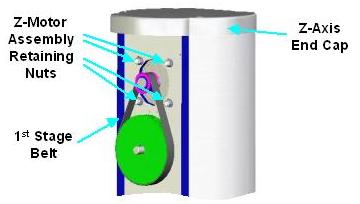
To relieve the tension on the 1st Stage Belt, first use a 8 mm open-ended wrench to loosen (but don't remove) the four nylon Z-Motor Assembly Retaining Nuts on the back of the Z-axis.

8.  

Using a 7 mm open-ended wrench, reach into the front of the Z-axis below the motor and back off the Jam Nut that locks the Jam Bolt.

9.  

Using the 7 mm open-ended wrench, back off the Jam Bolt that pushes the motor up and controls the 1st Stage Belt tension

10.  

Remove the 1st Stage Belt by sliding it off the large pulley first and then over the flanged pulley.

11.  

Replace the Z-axis Motor Assembly with the new assembly (Precise P/N PF10-MA-00049).

12.  

Replace the 1st Stage Belt and follow the instructions in the next section for properly setting the belt tension.

13.  

Tighten the Jam Nut and the 4 Z-Axis Assembly Retaining Nuts and replace the covers.