1.
Enable power to the robot's controller, but do not turn on power to the motors. This procedure should initially be executed with motor power disabled.
2.
Load Cal_PP into the controller's memory using either the Guidance Development Environment (GDE) or the web Operator Control Panel.
3.
Manually move the X and Y axes to a position more than one zero index away from their lower hard stop limits. Facing the robot with the power cord on the right, the X-axis lower stop limit is to the far right, the Y-axis lower stop limit is with the axis fully retracted, and the Z-axis lower stop limit is with the axis all of the way up. For the X and Y axes, a zero index distance is approximately 10 mm. Positioning an axis further away will not cause a problem but a shorter distance may cause this procedure to fail.
4.
Manually move the X, Y and Z axes to their lower hard stop limits. This motion will ensure that at least one zero index for the X and Y axes is detected by the controller. The final location of each axis will define the physical position that will correspond to their lower hard stop positions.
5.
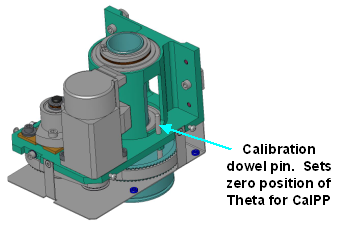
If the robot is equipped with a Theta axis, remove the theta axis cover and align the hole in the large pulley with the hole in the frame by inserting a 4mm diameter dowel pin through both holes. This will define the zero position for the Theta axis. This dowel pin is supplied with the Belt Theta Axis.
6.
Execute the Cal_PP program using GDE or the web Operator Control Panel. This program will execute in just a few minutes. During this time, it will compute the data required by the homing operation and will initialize the homing data stored on the flash disk and in the multiple turn counters for any absolute encoders. While this program is executing, several pop-up displays will appear either within GDE or on the Operator Control Panel. Please follow the provided instructions and correct any errors that may occur.
7.
Enable the power to the robot's motors and execute the homing sequence. The new encoder zero positions will take effect when the robot is homed.