Move.StartRealTimeMod Method

Initiates special trajectory mode that permits a GPL program to make incremental changes in the position and orientation of a planned path while the path is being executed.

Move.StartRealTimeMod ( coordinates, change_type )


Prerequisites


Parameters

coordinates

A required numeric expression that specifies the coordinate system in which the incremental changes are interpreted and the coordinate system in which the accumulated modifications are stored.

change_type

A required numeric expression that defines if the incremental changes are applied once or if the changes are repeatedly applied (i.e. they are interpreted as speeds).

Remarks

This method initiates a special trajectory mode whereby a GPL program can specify incremental changes in position and orientation that are immediately applied to the executing trajectory.  When this mode is active, each time that the Trajectory Generator computes a Cartesian set point, it automatically modifies the set point to include the accumulated incremental real-time changes.

This method can be used to incorporate sensor feedback or to alter a baseline path for special processes.  For example, if the tool tip must maintain a specific height as it moves above a distorted surface, input from a height sensor can be used to modify the planned path as the tool is moving.  As another example, if the robot is used for welding, a weaving motion can be superimposed on the basic weld path by adding a real-time change that moves back and forth perpendicular to the direction of travel.

When this method is executed, the Attached robot is immediately placed into this special trajectory mode even if a Cartesian motion is currently in progress.  Thereafter, any thread can post incremental changes in position (Dx, Dy, Dz) and orientation (Rx, Ry, Rz) that will dynamically alter the planned path.  Since these changes are immediately added to the planned path, the GPL program must guarantee that the magnitudes of each change is small to avoid abrupt motions.  If no motion is being executed, the changes will alter the stationary position of the robot's tool.  If a motion or sequence of motions are being executed, the changes will alter the planned tool path.  While this mode is active, only Cartesian motions are permitted.  This mode can span an arbitrary sequence of Cartesian motions and continues to operate even when no motion is being executed.

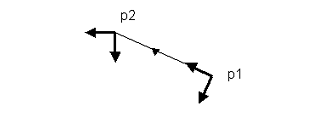
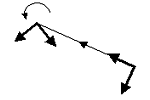
To simplify the use of this method for different applications, the coordinates parameter specifies one of several choices for the coordinate system in which the incremental changes are interpreted and accumulated.  To illustrate these alternatives, we will consider the following basic Cartesian motion where the tool orientation is rotated counter-clockwise as the tool tip moves along a straight-line path from p1 to p2.

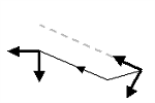
If the incremental changes are specified in World coordinates and are accumulated in World coordinates (World-World mode), incremental changes in position simply shift the entire path and changes in orientation rotate the tool tip about its end point.

Position Change

Orientation Change

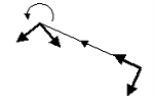
This mode decouples changes in orientation and position and so is conceptually very easy to use.  It is analogous to the motions permitted with the Manual Control Pendant's World jog mode.

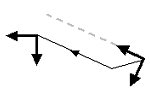
If the incremental changes are specified in Tool coordinates and the incremental changes are accumulated in World coordinates (Tool-World mode), incremental changes in position shift the path in a manner similar to World-World mode, but the shifts are initially evaluated along the instantaneously direction of the tool.  However, changes in orientation not only change the orientation of the tool, but also rotate the subsequent direction of the planned path.

Position Change

Orientation Change

This mode can best be understood if you imagine you are flying the toolP around the workspace.  You can slip the tool right or left or move forward or backwards to offset the path.  However, if you turn the tool, you are setting it course along a new baseline path and the taught path is relative to this new baseline.  This method is analogous to the motions permitted with the Manual Control Pendant's Tool jog mode.

The final method specifies changes in Tool coordinates and accumulates the incremental changes in Tool coordinates (Tool-Tool mode). 

Position Change

Orientation Change

This mode is analogous to dynamically changing the dimension and orientation of the robot's tool.  If you change the orientation in this mode, it generates a simple rotation about the tool tip.  However, if you change the position, this is equivalent to offsetting the tool and will cause the path to curve if the orientation of the tool changes.  If the tool does not change its orientation, incremental changes in position simply shift the path.

The set of coordinate systems to be used are defined by the coordinates parameter as shown in the following table.

coordinates Value Description

0

Idle.  Ignore incremental change commands.  Provided for completeness.

1

World-World mode.  Changes specified in the World coordinate system and accumulated in the World coordinate system.

2

Tool-World mode.  Changes specified in the Tool coordinate system and accumulated in the World coordinate system.

3

Tool-Tool mode.  Changes specified in the Tool coordinate system and accumulated in the Tool coordinate system.

During each Trajectory set point evaluation, any combination of incremental changes in any of the six degrees-of-freedom (Dx, Dy, Dz, Rx, Ry, Rz) can be simultaneously applied.  However, in terms of computational efficiency, if only incremental position changes are made, the computational requirements for applying the real-time modifications are significantly reduced from the general case of position and orientation changes.  So, incremental orientation changes should be specified as 0 unless needed.

As a convenience, the incremental changes can be specified as single steps that are only applied once or continuous changes that continue until new values are specified.  The continuous change modes are useful to produce smooth continuous changes without requiring that a GPL thread post new values each trajectory cycle.  The interpretation of the incremental changes are specified by the change_type parameter as follows.

change_type Value Description

0

No change.  Equivalent to specifying 0 for all 6 coordinates.

1

Once.  Changes are applied a single time and then no further changes are made until a new set of changes are posted.

2

Continuous, ignore System Speed.  Changes are interpreted as speeds (mm/sec or deg/sec) and are not affected by the setting of the System Speed on the web interface Operator Control Panel.

3

Continuous, consider System Speed.  Changes are interpreted as speeds (mm/sec or deg/sec) and are affected by the setting of the System Speed on the web interface Operator Control Panel.

This mode will remain in effect until one of the following occurs:

  1. The Move.StopSpecialModes method is executed to terminate all special control modes for the robot.
  2. A hardware error or hard E-stop or soft E-stop occurs.
  3. A RapidDecel is issued.
  4. The robot is detached by the user program either by issuing a detach command or by halting user program execution for any reason.

Examples

Example #1:  Move up/down in Z based upon DIO signals

Public Sub MAIN
Dim rtmod As New Thread("rtmod")
rtmod.Start ' Start RT change service thread
Robot.Attached = 1
Move.StartRealTimeMod(1,2) ' Turn on RT correction function
Move.Loc(p0, pf0)
Move.Loc(p1, pf0)
Move.WaitForEOM
rtmod.Abort
Move.StopSpecialModes ' Turn off RT correction function
Robot.Attached = 0
End Sub
Public Sub
rtmod
Dim rtm_spd(6) As Double
While True
Controller.SleepTick(2) ' Adjust every other traj tick
If (Signal.DIO(20001)) Then
rtm_spd(2) = 10 ' +10 mm/sec in Z
ElseIf (Signal.DIO(20002)) Then
rtm_spd(2) = -10 ' -10 mm/sec in Z
Else
rtm_spd(2) = 0 ' Don't move
End If
Move.SetRealTimeMod
(rtm_spd) ' Set new speed
End While
End Sub


Example #2: Add Tool-Y weaving to baseline motions

Const WEAVE_SPEED As Double = 20 'Weave moves at this mm/sec speed
Const WEAVE_MAGNITUDE As Double = 5 ' Weave magnitude
Const WEAVE_PRIORITY As Integer = 16 'Execution priority for the RealTimeMod
' thread
Const WEAVE_HP_TIME As Double = 0.250' Estimated execution time
Const WEAVE_N_PHASE As Double = 0.500 'RealTimeMod executed this many msec
' after trajectory generator.
Private WeaveMode As Integer ' Controls operation of weaving thread
' 0 = Not active
' 1 = Start weaving
' 2 = Weave executing
' 3 = Stop weaving
' Standard motion program.

Public Sub MAIN
Dim weave As New Thread("Weave")
WeaveMode = 0 ' Weaving not active
weave.Start ' Start weaving thread
Robot.Attached = 1
Move.Loc(p0, pfj)
Move.WaitForEOM

Move.StartRealTimeMod(3,2) ' Turn on RT correction function
WeaveMode = 1 ' Start weaving
Move.Loc(p1, pfs)
Move.Loc(p2, pfs)
Move.WaitForEOM

WeaveMode = 3 ' Stop weaving
While (weave.ThreadState = 2) ' Wait until weaving stops
Thread.Sleep(2)
End While
Move.StopSpecialModes
' Turn off RT correction function
Robot.Attached = 0
End Sub

' Weaving function

Public Sub Weave
Dim rtm_spd(6), traj_rate, dy As Double
traj_rate = Controller.PDbNum(600,1)*1000 ' Traj update rate in msec
Thread.Schedule(WEAVE_PRIORITY, traj_rate, WEAVE_HP_TIME, _
WEAVE_N_PHASE) ' Increase task priority

While True
Select
WeaveMode
Case 0 ' Weave not active

Case 1 ' Start weaving
rtm_spd(1) = WEAVE_SPEED ' Set default speed
Move.SetRealTimeMod(rtm_spd) ' Start weaving
WeaveMode = 2 ' Weaving active

Case 2 ' Weaving active
dy = Robot.RealTimeModAcm.Y ' Get current weave magnitude
If (Math.Abs(dy) >= WEAVE_MAGNITUDE) Then
rtm_spd(1) = -WEAVE_SPEED*Math.Sign(dy) 'Reverse direction
Move.SetRealTimeMod(rtm_spd) ' Set new speed
End If

Case
3 ' Stop weaving
dy = Robot.RealTimeModAcm.Y ' Get current weave magnitude
If (Math.Abs(dy) <= 1.5*WEAVE_SPEED) Then
Thread.CurrentThread.Abort ' Weave at center, stop
Else
rtm_spd(1) = -WEAVE_SPEED*Math.Sign(dy) 'Reverse direction
Move.SetRealTimeMod(rtm_spd) ' Set new speed
End If
End Select
Thread.Sleep
(1) ' Wait for next trajectory cycle
End While
End Sub


Datalog of Cartesian X/Y axes during weaving

See Also

Move Class | Move.SetRealTimeMod | Move.StopSpecialModes | Robot.CartMode | Robot.RealTimeModAcm